Expressvpn Glossary
DNS propagation

What is DNS propagation?
Domain Name System (DNS) propagation is the process by which changes made to DNS records take effect across the DNS, a distributed global network of servers. While a domain’s own authoritative servers usually record an IP address change in mere seconds, it can take a while for DNS resolvers around the world to incorporate this new information.
How does DNS propagation work?
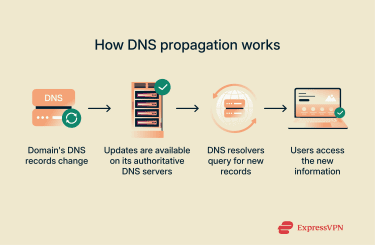 When a domain owner makes any change to the DNS records, like adjusting the IP address or switching to a new hosting provider, the new information must be shared across the wider DNS ecosystem. This process begins with the domain’s own authoritative DNS server, which accepts and reflects the new information immediately.
Other servers, including the DNS resolvers that enable end-user devices to locate the domain, need time to record the change. These resolvers, many of which are run by internet service providers (ISPs), store domain records in caches for set periods of time, so they temporarily retain the old information. An admin can provide instructions for how long resolvers should store the domain’s records in their caches, a period known as time to live (TTL).
Once this expires, caches containing the old record clear, queries for the new information are sent out, and updated records are retrieved from the domain’s authoritative DNS servers. The full propagation process can take anywhere from an hour to a few days.
Why is DNS propagation important?
DNS propagation affects how quickly and consistently users can access updated websites. While the process is ongoing, some users send DNS queries based on old records. This can lead to delays, error messages, and other issues when trying to access a site or service. Limiting this period of relative instability helps keep domains reliable.
A solid understanding of DNS propagation is required of admins responsible for handling things like website migrations, domain transfers, and new service launches. Propagation can be responsible for certain errors and explains why updates may appear to take effect instantly on some networks, but not others.
Where does DNS propagation apply?
DNS propagation takes place across the DNS infrastructure, which includes many distinct parts that work together to support the internet’s functionality. Domain and hosting providers play a central role in managing DNS records, while DNS-based services such as content delivery networks (CDNs) and load balancers rely on accurate, up-to-date DNS information to route traffic effectively. ISPs are also involved and can influence how long DNS propagation takes as they run major DNS resolvers and decide how these handle caching.
Further reading
- What is my DNS? How to check and find your DNS server
- DNS server not responding: How to fix it (step-by-step guide)
- Fast flux networks: Complete guide to risks and detection
FAQ
How long does DNS propagation take?
It can take anywhere from an hour up to a few days, all depending on factors like time to live (TTL) settings and caching policies for the many individual recursive resolver servers around the world.
Can I speed up DNS propagation?
Yes, domain admins can take certain steps to help DNS record changes propagate faster. Lowering the time to live (TTL) is the main tool available. It may also be possible to manually trigger cache refreshes on some public Domain Name System (DNS) resolvers. Retained outdated DNS records can often be resolved by flushing the local DNS cache or switching to another public DNS resolver, regardless of who manages the domain.
Why do some users see my old site?
This most commonly happens because Domain Name System (DNS) propagation has not completed yet, with some visitors using DNS resolvers that still have the old records. Within a couple of days, most (if not all) users should see the new changes.
How do I flush my local DNS cache?
The process varies slightly depending on the device and OS. On Windows 11, the DNS cache can be cleared by opening Command Prompt and entering ipconfig /flushdns. On macOS, the procedure requires opening Terminal and running the appropriate command for the OS version. For Yosemite and later, the command is sudo killall -HUP mDNSResponder.