
How to set up a static IP address (step-by-step guide)


If you need to consistently reach a device, such as a gaming server or a smart-home hub, you don't want its Internet Protocol (IP) address to change in the background. Assigning a static IP gives it a permanent location on your network, so you always know where to find it.
This article will guide you through all the steps to set up a static IP address on any device you have.
What is a static IP address?
A static IP address is a type of IP address that stays the same over time. Once it’s assigned, it stays with that device or connection unless you deliberately change it. This is different from a dynamic IP address, which is the default for almost every internet connection and home network. Dynamic IPs are also assigned automatically and can change from time to time.
Types of static IP addresses
Static IP addresses come in two main forms: you can have a static IP for your entire internet connection or for an individual device inside your home or office network. Note that public static IPs are assigned by your internet service provider (ISP), but not all ISPs offer them for residential plans, and they may cost extra.
Public static IP address (internet-facing)
A public static IP is a permanent internet-facing address assigned to your network by your ISP. It never changes, so people and services can always reach you at the same address. You might need a public static IP if you:
- Host a website or server from home: The site or service needs a single, unchanging internet address so browsers and apps outside the local network always know where to send traffic.
- Use remote desktop software: Your home or office must always be reachable at the same address so you can log in from anywhere without hunting down a new IP each time.
- Run Voice over Internet Protocol (VoIP) or business communication tools: Calls and data routes are tied to your network’s IP, so a fixed one helps keep those connections stable and predictable. That said, many modern services are cloud-based and can handle dynamic IPs, so while a static IP helps, it’s not always strictly necessary.
- Manage security cameras or monitoring systems remotely: The viewing app connects back to your network over the internet, and a static IP ensures it always connects to the right place.
- Need other users or systems to reliably connect to your network: A permanent IP removes the risk that connections break simply because your address has changed in the background.
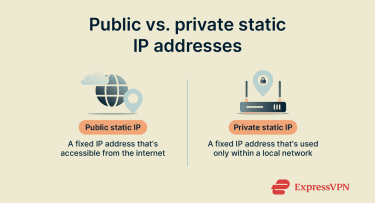
Private static IP address (inside your network)
A private static IP is a fixed address you assign to a device on your local network, such as network attached storage (NAS), server, printer, workstation, or smart-home hub. The device always uses the same IP address inside your network, which makes it easier to find and connect to. This is useful when you:
- Host a media or file server: The server needs a permanent address so your devices always know where to stream or download files from, without exposing it to the wider internet.
- Run smart-home systems: Controllers and automations depend on finding the same device every time, so a fixed IP prevents routines from breaking.
- Use port forwarding: Your router must always forward traffic to the same internal device, which only works if that device keeps the same IP address.
- Share a printer or other device across users: Giving it a permanent IP means everyone can keep using the same saved connection without re-adding it.
How to set up a static IP address on any device
The steps below focus on private static IP addresses, which you can set manually on the device itself, or configure via your router using Dynamic Host Configuration Protocol (DHCP) reservation (where the router always assigns the same IP to a device).
Setting up a static IP address works a little differently depending on the device you’re using. Below, we’ll walk through how to configure static IPs across the most common platforms.
If you run into connectivity issues after setting one up, you can check out our guide on IP configuration failures for troubleshooting tips.
Note: If you want a public static IP, this isn’t something that you can configure yourself. To get one, you’ll need to request it from your ISP. Many ISPs treat this as a business feature, so it’s often available as a paid add-on or part of a higher-tier plan, and it may require extra security considerations since your network becomes permanently reachable from the internet.
Choosing IP and Domain Name System (DNS) details
When you’re assigning a private static IP to a device, you need to enter several pieces of information. Here’s how to choose them.
- IP address (the device’s fixed address): Must be in the same subnet as your router’s local area network (LAN), usually 192.168.1.x or 10.0.0.x, and you should pick a number outside your router’s DHCP range to avoid conflicts. For example, if your DHCP assigns 192.168.1.2–192.168.1.100, pick something like 192.168.1.200.
- Subnet mask: Usually 255.255.255.0 for home networks.
- Default gateway: Set this to your router’s LAN IP (commonly 192.168.1.1 or 10.0.0.1).
- DNS servers (optional but recommended): Here, you can use your router (often the same as the gateway) or public DNS servers such as Google DNS (8.8.8.8 / 8.8.4.4) or Cloudflare DNS (1.1.1.1 / 1.0.0.1).
Tip: If you don’t want to manually pick an IP, most routers allow DHCP reservation, which keeps a device on the same IP automatically. This avoids mistakes with subnet, gateway, or DNS settings.
How to configure a static IP address on Windows 11
- Depending on whether you have a wired or wireless connection, click the Ethernet or Wi-Fi icon on the bottom-right of the taskbar and choose Network and Internet settings.
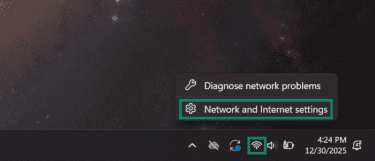
- Click on Advanced network settings in the Network & internet menu.
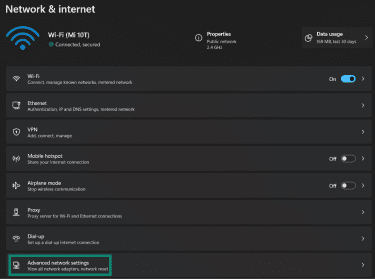
- Click the dropdown arrow next to your connected network in the Advanced network settings.

- Click the Edit button next to More adapter options.

- Scroll through the list, then click on Internet Protocol Version 4 (TCP/IPv4) and click Properties.
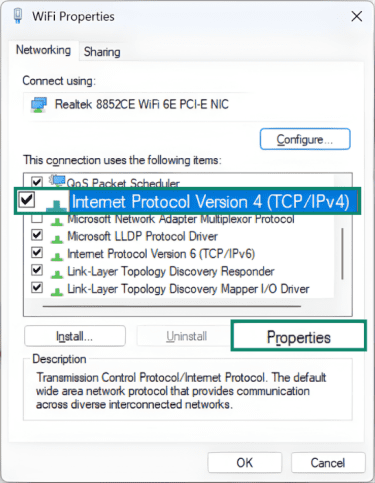
- Click the Use the following IP address option and fill in the fields with your static IP address details. Note that choosing this option will also require you to manually fill in the DNS fields. Once finished, click OK to save your settings.

Setting a static IP on macOS devices
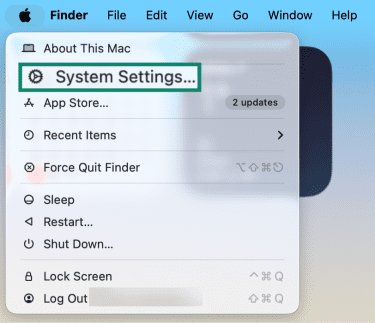
- Click the Apple logo on the top left and select System Settings.
- Click the Network tab on the left-hand menu, select the network you’re connected to, and click the Details button next to it.

- Click TCP/IP on the left-hand menu, then click Configure IPv4 and choose the Manually option.
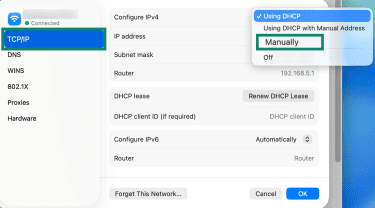
- Enter your static IP address details and click OK to save.

How to set a static IP on Android devices
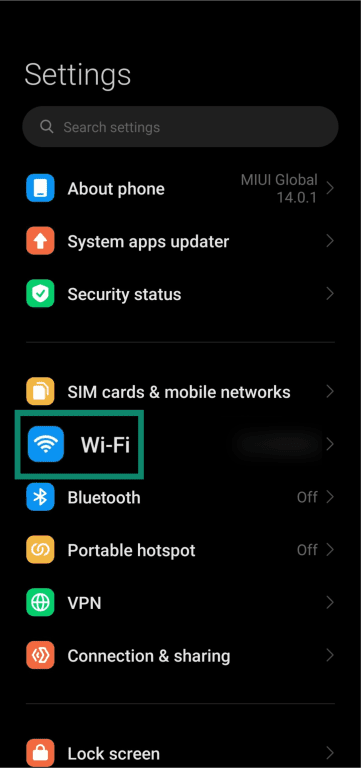
- Access the Settings menu on your Android device and tap Wi-Fi.
- Click the arrow next to your connected Wi-Fi network to open its details. Some devices might not have an arrow and may require you to tap and hold the connected network to open its details.
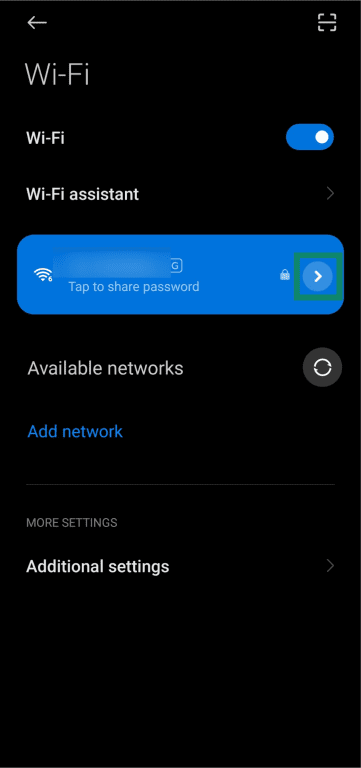
- Tap the IP settings menu in your network’s details.

- Choose Static from the IP settings options.
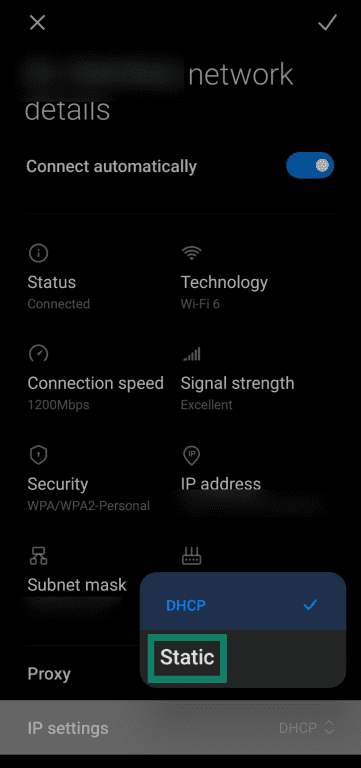
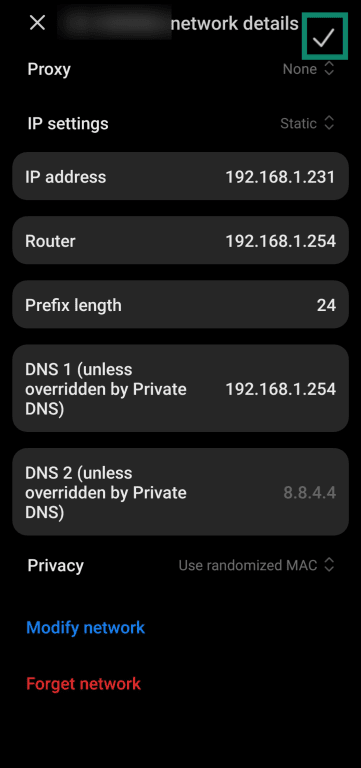
- Enter the static IP address details and tap the check mark on the top-right to save the settings.
How to configure a static IP on iOS
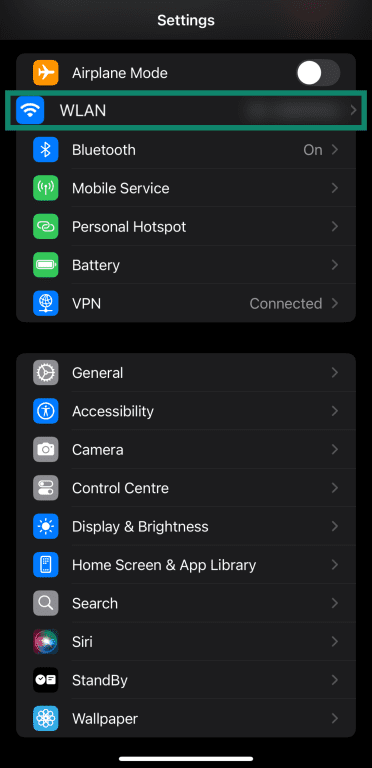
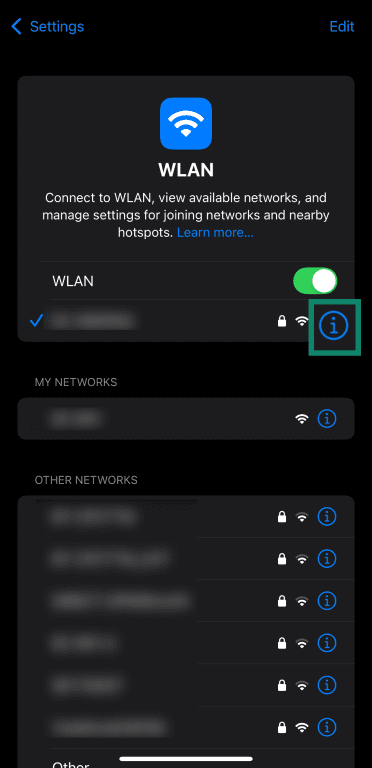
- Access the Settings menu on your iOS device.

- Tap WLAN or Wi-Fi in the Settings menu.
- Tap the ‘i’ icon next to your connected Wi-Fi network to open its details.
- Tap the Configure IP field in your network’s details.
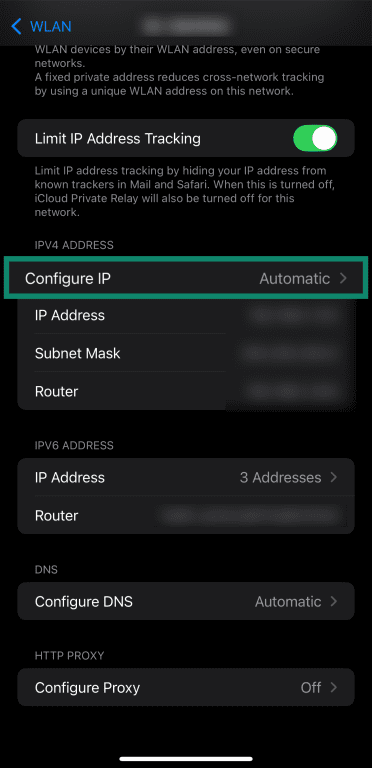
- Tap the Manual option in the Configure IPv4 menu.

- Fill in the static IP address details and tap the Save button on the top-right.

How to set up a static IP address on Linux
You can use NetworkManager via the nmcli commands to configure static IP addresses on Linux through the terminal.
Note: If the steps below don’t work, try entering “sudo” before each of the terminal commands.
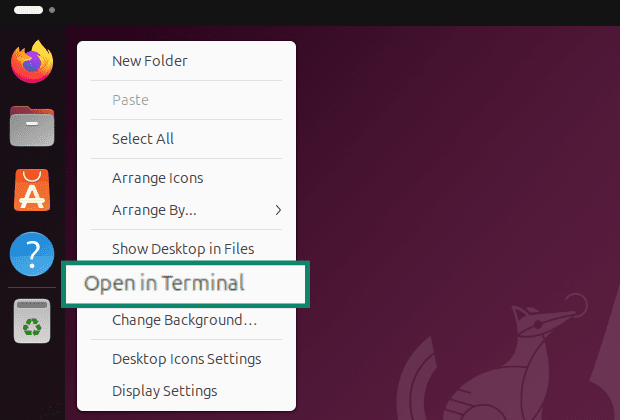
- Right-click the desktop and click Open in Terminal. Alternatively, you can use Ctrl+Alt+T to open the terminal directly.
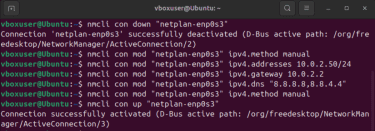
- Type the “nmcli connection show” command to see the exact name of your network, as you’ll need this to assign a static IP address.

- To assign a static IP address on Linux, you need to deactivate your network connection, manually assign the IP address, and reactivate it. For this purpose, enter the following commands in sequence:
- nmcli con down "ConnectionName"
- nmcli con mod "ConnectionName" ipv4.method manual
- nmcli con mod "ConnectionName" ipv4.addresses "IPAddress/24"
- nmcli con mod "ConnectionName" ipv4.gateway "GatewayIPAddress"
- nmcli con mod "ConnectionName" ipv4.dns "PrimaryDNSIP,SecondaryDNSIP"
- nmcli con up "ConnectionName"
How to use a static IP address on Raspberry Pi
Raspberry PI’s Bookworm operating system also uses NetworkManager as its default network configuration tool, meaning you can use the terminal and follow the exact same steps as the Linux guide above to configure a static IP address on your Raspberry Pi.
How to set a static IP address for a device through your router
You can use a process called DHCP reservation to manually assign private static IP addresses to devices through your router. However, you need to know the Media Access Control (MAC) address of your device beforehand; here’s how you can find it for various devices.
macOS
- Open the System Settings menu.
- Click the Network tab on the left side, select your network, and click the Details button.
- Find the MAC address in the Hardware tab of the Details menu.
Windows
- Open the Run menu by pressing the Windows + R keys.
- Type cmd and click OK to open Command Prompt.
- Type the ipconfig /all command.
- The MAC address will be under Ethernet adapter for wired connections and Wireless LAN adapter for wireless connections.
Android
Note: The steps below might vary slightly depending on which Android device you have.
- Access the Settings menu.
- Open the About or About phone menu (depending on your device).
- Open the Detailed information menu.
- Look for your device’s Wi-Fi MAC address.
iOS
- Access the Settings menu.
- Open the General menu.
- Navigate to About.
- Scroll down to find the Wi-Fi address, which is the MAC address.
Linux
- Access the Linux terminal.
- Type the ip addr show command.
- Find the MAC address next to the link/ether entry in the command’s output.
Assigning a static IP address via your router using DHCP reservation
- Access your router’s configuration panel by typing 192.168.1.1 or 192.168.0.1 in your browser’s address bar and pressing Enter. If neither of these addresses works, check the back of your router to determine what your address is.
- Enter your router’s administrator username and password to log in. Both these details will also be on the back of your router.
- Navigate to the router’s configuration menu and look for LAN settings. These may be under a tab called Advanced settings or something similar.
- Enter the MAC address of your device and the static IP address you wish to assign it.
- Save your settings and restart your router and device.
It’s worthwhile to reset your router to restore it to default settings if you’re having trouble using it to assign static IP addresses to devices.
Note: When setting up local static IP addresses on multiple devices, ensure you’re tracking which ones you’ve used. Otherwise, you may accidentally have an IP address conflict where you end up giving the same address to different devices.
Security considerations when using static IPs
While static IP addresses can make networking more predictable, they come with a few significant trade-offs. These tradeoffs vary depending on whether the IP is public or private.
How to securely use a public static IP
Note: In this section, we discuss corporate virtual private networks (VPNs) that allow authorized users to securely connect to ar private network, rather than commercial VPNs like ExpressVPN that are designed to protect individual users’ traffic.
A public static IP can increase security risk because a network that’s always reachable at the same address may become a repeated target for scans and attacks if it isn’t properly secured. Also, static public IPs often cost extra, since many ISPs treat them as a business-grade feature. To make sure your connection is safe:
- Secure every exposed service with authentication and encryption: If you’re running remote desktop, web admin panels, or servers, make sure they require strong passwords or Secure Shell (SSH) keys and use encrypted connections.
- Use a firewall to limit who can connect: Whenever possible, restrict access to only the ports and services you actually need, and ideally, only from trusted source IPs.
- Keep devices and software updated: A permanent address means attackers can keep probing it over time. Security patches are particularly important here, even more so than on a typical home network.
- Avoid exposing admin tools directly to the internet: If plausible, place management interfaces behind a VPN instead of opening them to the public.
- Monitor connections and logs periodically: Routers, servers, and cloud dashboards normally include logs, and reviewing them regularly can help you spot suspicious activity early.
How to securely use a private static IP
Private static IPs aren’t exposed to the wider internet, but they still come with responsibilities. Because they’re assigned manually, they need to be planned and documented, or you risk giving two devices the same address or placing a device on the wrong subnet. To prevent potential faults:
- Choose addresses outside the DHCP pool: This helps prevent conflicts where the router accidentally gives the same address to another device.
- Document what you assign: Maintain a list of each device’s IP and MAC address so future changes don’t require guesswork.
- Use DHCP reservation when possible: Assigning static IPs from the router reduces the chances of human error compared to configuring every device manually.
- Stick to a logical numbering scheme: For example, group key devices (NAS, server, printer) near each other in the IP range. This makes any troubleshooting easier.
- Double-check subnet and gateway settings: Incorrect details here can knock a device off the network entirely.
Does ExpressVPN offer a static IP address?
Yes, ExpressVPN has a dedicated IP address that lets you get a static IP address tied to a server location in one of over 20 countries. It’s a single unchanging IP address that’s unique and assigned only to you. The dedicated IP address provides various benefits, like reducing the likelihood of CAPTCHAs or other bot filters flagging you when you’re surfing the web.
You’ll also get a more consistent online identity, which is helpful when you travel abroad and need to access banking or other sensitive accounts. These could be flagged as a precaution against fraud if regularly accessed with different IPs, but a dedicated IP address helps prevent this by maintaining the same IP address no matter where you log in from, as long as you’re connected to ExpressVPN.
FAQ: Common questions about setting up a static IP address
Can I get a static IP address for free?
It’s highly unlikely that you’ll be able to get a public static IP address for free, as most internet service providers (ISPs) either require a one-time fixed fee or a recurring monthly payment for this feature.
Will a static IP improve internet speed?
No, while static IP addresses might help with connection stability, your internet speed depends on the bandwidth of your plan and won’t be affected.
Do I need a static IP for remote access?
While not strictly required, static IPs make remote access easier because it’s simpler to remotely connect to a device when you always know the address to connect to.
How do I know if I have a static IP?
Check your current IP address, wait 24 hours, or restart your router and check again. If the address changes, you have a dynamic IP. That said, some internet service providers (ISPs) may keep the same dynamic IP for a longer period (days or weeks), so a single 24-hour check isn’t always definitive. If you’re unsure, you can contact your ISP or check your service plan.
Do I need to restart my device after setting a static IP?
Usually, no; most devices apply static IP changes immediately when you save the configuration. However, sometimes you might have to disconnect and reconnect to your network for the changes to take full effect.
Does a static IP affect privacy or tracking?
Yes, static IPs are easier to track than dynamic IPs because they don't change. Websites and services can more easily associate your static IP with your browsing history over time. Using a static IP with a VPN can mitigate this kind of tracking.
Take the first step to protect yourself online. Try ExpressVPN risk-free.
Get ExpressVPN


Comments
I am with ExpressVPN for 7 years now, is the most expensive Vpn in the market but they provide good service for the price, you can't find faster Vpn without dropping speed for streaming or your sensitiv business in other countries, I purchased Aircove Wich is express vpn router and I have all my devices connected with no issues and I have so many other future beside Vpn like ad blockers and parental control and password management, the only thing I will say about the negative side is I feel recently customer service is not responding as fast as before, anyways I recommend this Vpn all the way, what you waiting for? Come and see it yourself